
 When it comes to keeping your 2025 Subaru running smoothly, few things are more important than your brakes. Whether you're behind the wheel of a rugged Subaru Crosstrek, a spacious Ascent, or a sleek Legacy, maintaining optimal braking performance is key to both safety and driving confidence. Over time, your brake pads and rotors wear down, and when it's time for a replacement, tackling the job yourself can save you money and give you the satisfaction of a job well done. The process of replacing brake pads and rotors may seem intimidating at first, but with the right tools and careful attention, it’s a task you can confidently take on.
In this guide, we'll break down each step to help you replace the brake pads and rotors on your Subaru, ensuring your vehicle stays safe and responsive. From gathering the necessary tools to properly installing the new parts, we've got you covered. And if DIY isn’t your thing, no worries! Cascade Subaru in Wenatchee is here to handle all your Subaru brake service and Subaru brake repair needs. Contact us today, and our expert team will ensure your Subaru is in top condition and ready to roll.
Tools Needed to Change Your Subaru's Brake Pads
Before you start changing the brake pads and rotors on your Subaru, it’s essential to gather all the tools and parts you'll need. Here’s a list of what you'll need to get the job done:
-
Jack and Jack Stands: To lift the car safely.
-
Lug Wrench: To remove the lug nuts.
-
Brake Fluid: Make sure to have DOT fluid on hand if needed.
-
C-Clamp or Brake Caliper Tool: To compress the caliper piston.
-
Socket Set: For removing bolts on the caliper and rotor.
-
Torque Wrench: To tighten bolts to the correct specification.
-
New Brake Pads: Replacement pads are essential for safe braking.
-
New Brake Rotors: Make sure the rotors are compatible with your Subaru model.
-
Anti-Seize Lubricant (Optional): To prevent squeaks and ease future maintenance.
-
Brake Cleaner: To clean the rotors before installation.
-
Bungee Cord or Rope: To suspend the caliper without putting strain on the brake lines.
Having all the necessary tools and parts ready will make the process quicker and smoother. For Subaru owners who want their brakes to perform optimally, Subaru brake service is always available. If you’re not sure about the parts or just want help, Cascade Subaru in Wenatchee is here to assist!
Preparing Your Subaru for Brake Maintenance
Before starting, ensure that your Subaru is parked on a flat, stable surface. Engage the parking brake to prevent any accidental rolling. For added safety, here’s what you should do:
-
Park the Vehicle Properly: Park your Subaru in a spot that’s level and stable. This ensures safety while you work.
-
Gather the Tools: As listed above, make sure all tools are within reach.
-
Loosen the Lug Nuts: With the vehicle still on the ground, use your lug wrench to loosen the lug nuts. Don’t remove them completely yet, just loosen them enough to make removal easier once the car is lifted.
-
Check Brake Fluid: Before starting, check the brake fluid level. It’s important to have the right level before working on the brake pads.
Once these steps are done, you’re ready to proceed with lifting your Subaru and removing the wheels. If you're working on a larger Subaru like the Ascent, the process will be the same, though the vehicle may be heavier. Always prioritize safety to avoid any injuries.
Lifting Your Subaru and Removing the Wheels
Lifting your Subaru properly is crucial to ensure you work safely. Here's a step-by-step guide for lifting your car and removing the wheels:
-
Lift the Vehicle: Use a jack to raise your Subaru. Once the vehicle is high enough, place the jack under it for added safety. Never rely on the jack alone to hold the vehicle.
-
Remove the Wheels: After securing the car with jack stands, finish removing the loosened lug nuts and take off the wheels. Set the wheels aside on a flat surface.
-
Check the Brake Pads: With the wheels off, you’ll be able to access the brake system. Take note of the condition of the Subaru brake pads and rotors. If you notice any deep grooves or excessive wear, they should be replaced immediately.
When handling larger Subaru models like the Legacy, the process remains similar, but always double-check the owner’s manual for specific details.
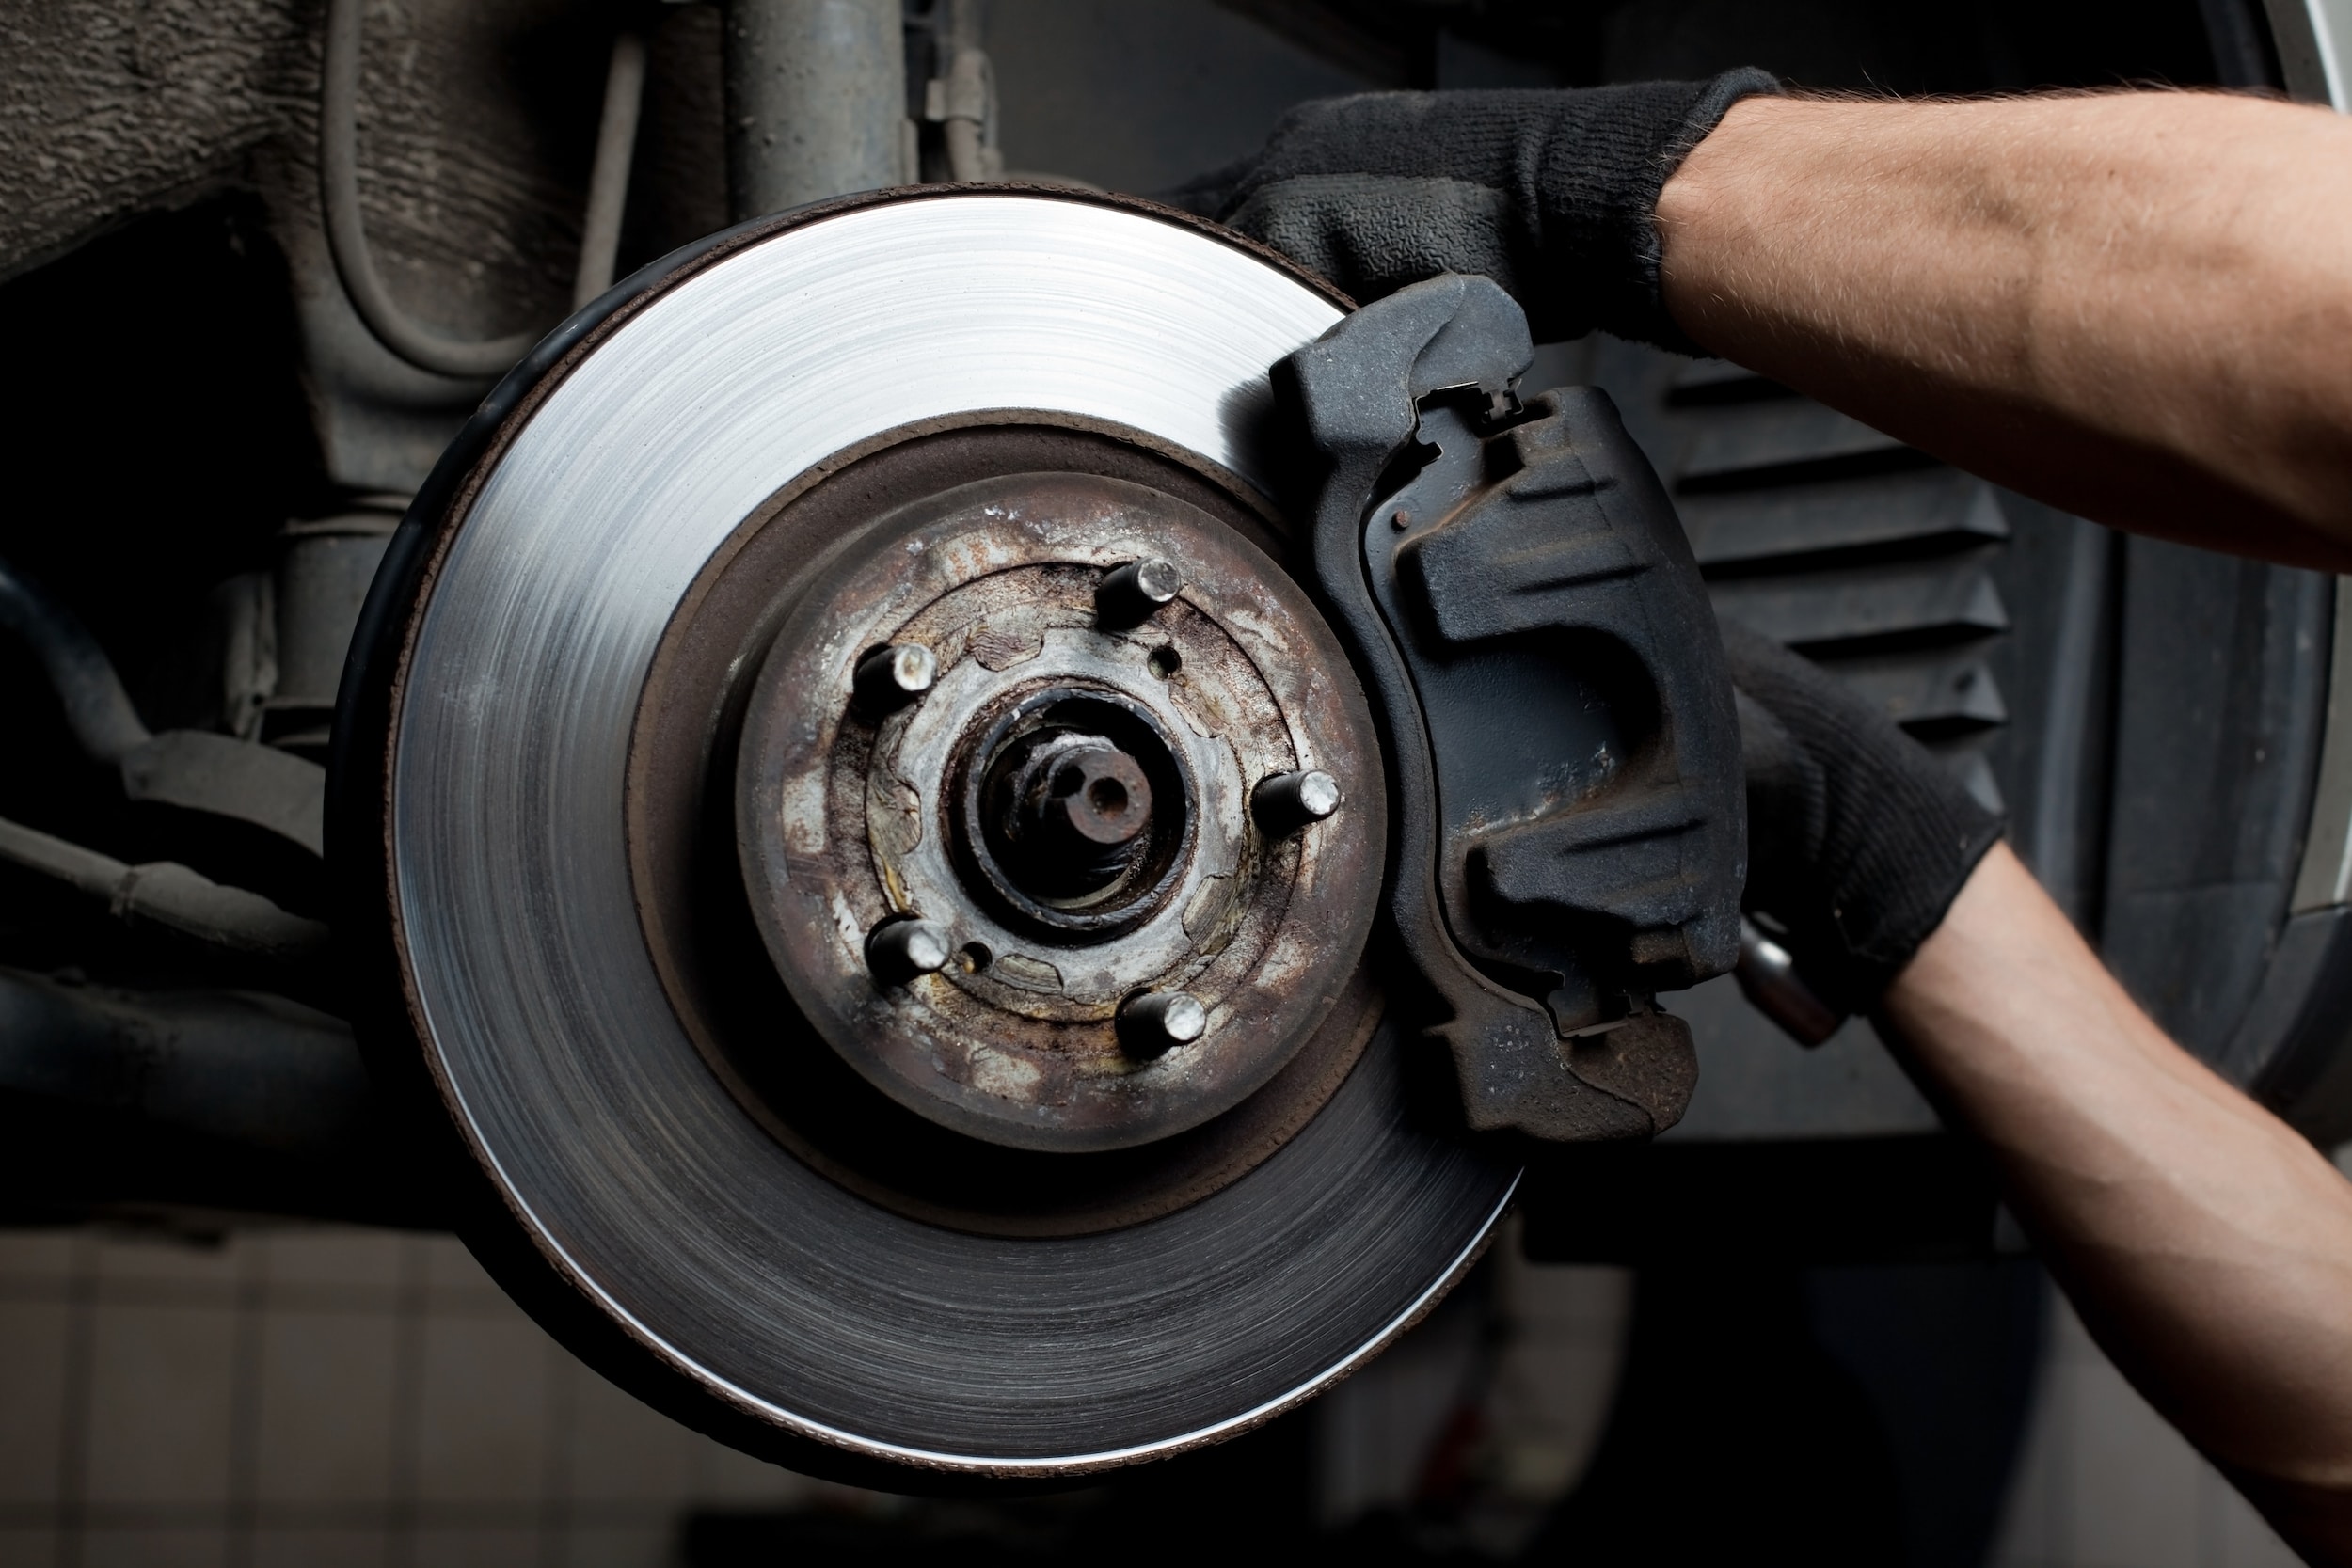
Accessing the Brake Caliper and Removing the Brake Pads
The next step is accessing the brake caliper to remove the old brake pads. Here's how you can do it:
-
Locate the Brake Caliper: The brake caliper is the component that holds the brake pads in place. You'll need to remove it to access the brake pads.
-
Remove the Caliper Bolts: Using a socket wrench, unscrew the bolts holding the brake caliper in place. You might need to use some force if they are tightly secured.
-
Suspend the Caliper: After the caliper is free, do not let it dangle by the brake line. Instead, use a bungee cord or rope to hang it from the suspension or chassis.
-
Remove the Brake Pads: Slide the old brake pads out of the caliper bracket. Make sure to note how they’re positioned, as the new ones will need to be placed the same way.
This step is crucial for accessing the Subaru brake pads and getting ready for the installation of the new ones. If you’re replacing the rotors, the next section will guide you through that process.
Removing the Old Brake Rotor
Now that the brake pads are removed, you can move on to the rotor. Here's how to do it:
-
Inspect the Rotor: Look at the brake rotor to see if it’s heavily worn or damaged. If it is, it’s time to replace it.
-
Remove Rotor Screws: Some rotors are held in place by small screws. If your Subaru’s rotors have these, use the correct screwdriver or socket to remove them.
-
Tap Gently: If the rotor doesn’t come off easily, tap it lightly with a rubber mallet to loosen it. Be careful not to damage the rotor or surrounding components.
-
Remove the Rotor: Once the rotor is free, slide it off the wheel hub.
For Ascent owners or those with heavier vehicles, the rotors may be heavier, so use extra caution when handling them.
This guide will help you through each stage of replacing your Subaru’s brake pads and rotors. For those who aren’t comfortable with DIY repair, remember that Subaru brake repair services are just a visit away at Cascade Subaru in Wenatchee. Our experts can help ensure your Subaru remains safe and in top condition.
Installing the New Brake Pads and Rotors
Once you have removed the old parts, it’s time to install the new brake pads and rotors. This process is straightforward but requires careful attention. Here are the basic steps to follow:
-
Align the new rotor: Place the new rotor onto the wheel hub. Ensure it sits correctly and is flush with the mounting surface.
-
Clean the rotor: Before installing the new brake pads, wipe the rotor with brake cleaner to remove any protective oils.
-
Install the brake pads: Slide the new brake pads into the caliper bracket. Make sure they are aligned properly and seated evenly.
-
Lubricate the contact points: Apply brake lubricant to the contact points of the caliper and pads. This will help with smooth braking and reduce noise.
-
Check for movement: Make sure the brake pads move freely but are not too loose in the caliper.
Once everything is in place, double-check all parts to ensure they are secure. Tighten bolts as needed.
Reinstalling the Brake Caliper
After the brake pads and rotors are set, you can reinstall the brake caliper. This step is vital to ensure the brakes work properly. Follow these steps to do it right:
-
Position the brake caliper: Slide the caliper over the new brake pads. It should fit snugly over the pads and the rotor.
-
Secure the caliper: Use the caliper bolts to attach it to the bracket. Tighten them with a wrench until they are firm, but don’t overtighten.
-
Check caliper movement: Ensure that the caliper moves smoothly over the pads. It should not bind or stick.
-
Inspect brake line: Make sure the brake line is not pinched or damaged during the installation process.
Once everything is secured, give the caliper a final check for proper alignment.
Reassembling the Wheel and Lowering the Vehicle
Now that the caliper is back in place, it’s time to reassemble the wheel. This step involves putting everything back together and lowering your vehicle safely.
-
Place the wheel on the hub: Lift the wheel and align it with the mounting holes on the wheel hub.
-
Insert and tighten the lug nuts: Hand-tighten the lug nuts first, making sure the wheel is seated evenly. Then use a wrench to tighten them in a crisscross pattern for even pressure.
-
Lower the vehicle: Carefully lower the vehicle off the jack. Once it’s back on the ground, give the lug nuts a final tightening with a torque wrench.
-
Check the wheel: Give the wheel a spin to ensure it turns freely and doesn’t make any unusual noises.
The reassembly is complete. Now, you’re ready for the final step.
Testing Your New Brakes
After you’ve reassembled everything, it’s time to test your new brakes. This is an important step to ensure your work is successful.
-
Start the vehicle: Turn on the engine and press the brake pedal lightly to check for any unusual softness or resistance.
-
Test drive: Take the vehicle for a short test drive in a safe area. Start slow, and gradually increase speed. Pay attention to how the brakes feel.
-
Listen for noises: Any squealing or grinding sounds could indicate a problem with the installation.
-
Check for vibrations: If the brake pedal vibrates when you apply pressure, this could signal an issue with the rotors.
If the brakes pass the test, you’ve completed the replacement!
Common Mistakes to Avoid During Brake Pad and Rotor Replacement
When performing brake maintenance, there are a few common mistakes to avoid. Preventing these errors will help ensure your brakes work safely and effectively.
-
Skipping the cleaning step: Not cleaning the rotor before installing the pads can lead to reduced braking performance and noise.
-
Using incorrect brake pads or rotors: Always double-check that you are using the correct parts for your vehicle’s make and model.
-
Over-tightening bolts: Tightening caliper bolts or lug nuts too much can damage threads or cause issues with the brake system.
-
Ignoring brake fluid levels: If you’re changing the brake pads, check the brake fluid levels. Low fluid can affect brake performance.
-
Not testing the brakes: Always test the brakes after the installation to ensure they function properly.
Avoiding these mistakes will help you maintain optimal brake function and safety.
When to Consider Subaru Brake Service or Subaru Brake Repair
Your vehicle's brake system is vital for safety. While brake pads and rotors wear down over time, there are signs that it’s time for professional service. If you notice any of these issues, it's wise to consider brake service or repair.
-
Squealing or grinding sounds: These noises often mean the brake pads are worn down. It's essential to replace them soon to avoid rotor damage.
-
Vibrations or pulsations: If your brake pedal vibrates or pulses when applying the brakes, it could be a sign of warped rotors.
-
Longer stopping distance: If your Subaru takes longer to stop or the pedal feels soft, the braking system may not be functioning properly.
-
Brake warning light: If the brake light comes on, it may indicate low brake fluid or another issue in the system.
-
Uneven brake pad wear: If you notice that your pads are wearing unevenly, it could signal issues with the brake calipers or rotors.
If you experience any of these symptoms, it’s a good idea to schedule a brake inspection at your local Subaru dealership.
Understanding the Cost of Subaru Brake Pads and Rotors
Understanding the cost of brake repairs can help you budget for maintenance. The price for brake pads and rotors can vary, depending on the type of parts and your Subaru model.
-
Brake Pads: Brake pads are generally less expensive than rotors. However, the price varies depending on the quality and type of pads (organic, semi-metallic, or ceramic).
-
Brake Rotors: Rotors tend to be more costly than brake pads. Their price can also fluctuate based on brand, material, and vehicle model.
-
Labor Costs: Labor is a significant factor in the overall cost. A Subaru brake repair service will typically take 1 to 2 hours, depending on the complexity.
-
Package Deals: Many service centers offer discounts if you replace both brake pads and rotors at the same time.
You may also want to inquire about the overall cost when scheduling a brake service to understand the total expense. Some repairs may require more work, leading to a higher price.
Maintaining Your Brakes for Long-Term Performance
To get the most out of your brakes, regular maintenance is key. Here are some tips to help extend the life of your brake pads and rotors, keeping your Subaru in top condition.
-
Check brake fluid levels regularly: Low fluid can lead to poor braking performance. Top off the brake fluid as needed.
-
Drive with care: Avoid harsh braking and sudden stops. This helps reduce the wear on your brake pads and rotors.
-
Monitor brake pad thickness: Check your brake pads for wear. Replace them when they’re worn down to 3mm thick or less.
-
Inspect rotors for damage: Check your rotors for scoring, grooves, or uneven wear. If you notice any issues, get them replaced or resurfaced.
-
Avoid excessive heat: Try not to ride the brakes during long descents, as excessive heat can cause damage to your brake system.
Maintaining your brakes is simple but essential. Regular checks and gentle driving habits can help prevent costly repairs and ensure safe, smooth braking for years to come.
Can I replace brake pads and rotors myself?
Yes, replacing brake pads and rotors can be done yourself if you have the right tools, mechanical knowledge, and experience. However, if you're unsure, it’s best to consult with a professional to ensure everything is done safely and properly.
How often do you need to replace brake rotors on a Subaru?
Brake rotors typically need to be replaced every 30,000 to 70,000 miles, depending on your driving habits and the model of your Subaru. Regular inspections can help determine when it’s time for replacement.
How much does it cost to replace rotors on a Subaru?
The cost to replace rotors on a Subaru can range from $300 to $600 per axle, including labor. The price can vary based on the model, type of rotors, and location.
How much do Subaru brake pads cost?
Subaru brake pads typically cost between $100 and $250 per axle, depending on the model and the type of brake pads chosen.
How long do Subaru brake pads last?
Subaru brake pads generally last between 30,000 to 70,000 miles, depending on your driving style and the conditions in which you drive. Regular inspections can help you gauge when to replace them.
Get Your Subaru's Brakes Checked at Cascade Subaru
At Cascade Subaru, we’re always here to help with your vehicle maintenance needs. If you're looking for guidance on brake pads and rotor replacement or have any other Subaru-related questions, our team is happy to assist. Don't hesitate to contact us for more details.
If you’re in Wenatchee, we invite you to check out our diverse selection of Subaru vehicles, including the popular Subaru Crosstrek, the versatile Ascent, and the dependable Legacy. Whether you’re searching for a vehicle that’s perfect for urban drives or outdoor adventures, we have the right choice for you.
While you’re here, take a moment to explore some of our other helpful resources. If you’re wondering whether it’s time to upgrade your current ride, we’ve got a guide that can help you spot the signs. Thinking about a new, powerful car? You’ll want to learn why the Subaru WRX is a game-changer. Plus, if you're interested in in-car technology, our guide to Subaru's STARLINK Infotainment System will walk you through its features and benefits.
Visit Cascade Subaru today and continue exploring all the great options we offer to enhance your Subaru experience!